Archive

Archive for the ‘Automation’ Category

Google Books Downloader

August 17th, 2012 No comments

A few months ago, I started a pet project to download free books available at Google Books.

My main goal when I started this project was to learn more about JavaScript headless browsers (PhantomJS in this case), which used CasperJS to drive it.

CasperJS was at version 0.6.6 back then and it had a nasty bug that prevented us from downloading binary files with the casper.download() method, so my script initially saved a list of the pages in a wget friendly format.

Now that the bug is fixed, I updated the script to save the pages automatically.

I still haven’t implemented any command line switches, so the book to download is still hardcoded (spoil alert: the book is actually a 1964 issue of the Popular Science magazine, which has a very interesting article on automation :), and you can’t select between saving the wget friendly list or saving the pages automatically.

Feel free to fork the project, improve it and send me pull requests :)

Automating the hurdles Google doodle

August 7th, 2012 4 comments

Today’s Google doodle is an interactive hurdles game in homage to the London 2012 olympics:

Google Olympics Doodle

Inspired by Željko‘s Pacman doodle automation using Watir, I decided to give Sikuli a shot and see if I could automate it.

The following script successfully plays the Hurdles game but doesn’t jump (yet). It finishes the game with two stars in 10.8 seconds (running on my machine, that is).

Google Doodle Sikuli Script

Google Doodle Hurdle Results

It seems like Sikuli takes too long to identify the objects, so if we add any find() or exists() calls in-between steps, the scripts performs really bad and finishes in about 50 seconds instead of just 10.8.

Sorry for not providing the code, sliced screenshots or a better tutorial for Sikuli. It should be pretty straightforward to reproduce it :)

Thanks to Iraê for the quick pairing session before lunch :)

Categories: Automation Tags: ,

Better reporting with ReportNG

November 15th, 2010 No comments

Numbers. Everybody likes numbers.

After executing your test suite you probably want to show off some numbers to your team or boss and say “Hey look, all our 391829 tests passed!”, don’t you?

If you are using TestNG’s default reporting class, your reports won’t look as impressive as Daniel Dyer‘s ReportNG library for TestNG.

With ReportNG, you can change this rather ugly (no offense here, Cédric!) report:

TestNG default HTML report

TestNG default HTML report

into this beautiful collection of numbers:

ReportNG HTML report - overview

ReportNG HTML report - overview

ReportNG HTML report - details

ReportNG HTML report - details

To achieve this, all you have to do is download ReportNG here, add it to you project’s classpath and add the following lines to your testng.xml file:


This will add the ReportNG listener to generate HTML reports after your tests are run. If you want JUnit style XML reports (for continuous integration servers, for example), just add the following line to the section of the testng.xml file:


which should result into this:

ReportNG XML output

ReportNG XML output

Neat and simple, isn’t it?

Using TestNG to launch your tests (and the Selenium server)

August 31st, 2010 5 comments

TestNG (NG stands for Next Generation) is a Java testing framework written by Cédric Beust. To learn more about it, just head over to the official website, the user community at Google Groups or watch Cédric’s presentation at GTAC (Google Test Automation Conference) 2007.

If you are reading this blog, you are probably interested in running end-to-end functional tests with Selenium. TestNG is perfect for that task, because unlike other testing frameworks, it’s very flexible and easy to use, and still very powerful. If you need to run your tests in a specific order, you can either define test dependencies between methods/groups or set TestNG to run your methods in the same order you have specified. Everything can be done via annotations or through a XML file.

In this post, we will cover the following topics:

1) How to model your test case
2) How to use TestNG configuration methods with parameters
3) How to configure the TestNG XML file to run tests in a specific order
4) How to install the TestNG Eclipse plugin
5) How to make the test design a little better for the future

Here we go!

1) Modeling your test case

Before writing a test case, you need to know how and what will be validated. Since I like to work with live examples, let’s go back to the WordPress “Create New Post” test case from our first post:

1) Go to http://demo.opensourcecms.com/wordpress/wp-login.php
2) Enter “admin” in the “Username” field
3) Enter “demo123″ in the “Password” field
4) Click on the “Log In” button
5) Verify that the text “Howdy, admin” is present
6) Click on the “Posts” link
7) Click on the “Add New” button
8) Type “Selenium Demo Post” in the title field
9) Click on the “Publish” button
10) Verify that the text “Post published” is present

Considering this scenario, the first thing that comes to mind is creating a long test case that goes through all the steps. This might be a good approach if you are writing a manual test case. However, since we are writing an automated test, we want to write our script as modular as possible to be able to reuse parts of it in future scenarios.

This is how I would break down the test:

1) Launch the WordPress site
2) Open the Admin Login page
3) Enter valid login data
4) Navigate to the Write Post page
5) Write the post
6) Publish the post
7) Verify that it was actually posted

Keep in mind that this is just an example. You are free to model your tests in any way you want, as long as they have business value and will validate your business logic.

Let’s see how to do that with actual Java code:

@Test(description="Launches the WordPress site")
public void launchSite(){
selenium.open("");
selenium.waitForPageToLoad("30000");
assertEquals(selenium.getTitle(), "Demo | Just another WordPress site");
}

@Test(description="Navigates to the admin page")
public void openAdminPage(){
selenium.open("wp-admin");
selenium.waitForPageToLoad("30000");
assertEquals(selenium.getTitle(), "Demo › Log In");
}

@Test(description="Enters valid login data")
public void loginAsAdmin(){
selenium.type("user_login", "admin");
selenium.type("user_pass", "demo123");
selenium.click("wp-submit");
selenium.waitForPageToLoad("30000");
assertTrue(selenium.isTextPresent("Howdy, admin"));
}

@Test(description="Navigates to the New Post screen")
public void navigateNewPost(){
selenium.click("//a[contains(text(),'Posts')]/following::a[contains(text(),'Add New')][1]");
selenium.waitForPageToLoad("30000");
assertTrue(selenium.isTextPresent("Add New Post"));
}

@Test(description="Writes the new post")
public void writeBlogPost(){
selenium.type("title", "New Blog Post");
selenium.click("edButtonHTML");
selenium.type("content", "This is a new post");
//TODO:Assert
}

@Test(description="Publishes the post")
public void publishBlogPost(){
selenium.click("submitdiv");
selenium.click("publish");
selenium.waitForPageToLoad("30000");
assertTrue(selenium.isTextPresent("Post published."));
}

@Test(description="Verifies the post")
public void verifyBlogPost(){
selenium.click("//a[contains(text(),'Posts') and contains(@class,'wp-first-item')]");
selenium.waitForPageToLoad("30000");
assertTrue(selenium.isElementPresent("//a[text()='New Blog Post']"));
}

@Test(description="Logs out")
public void logout(){
selenium.click("//a[text()='Log Out']");
//TODO:Assert
}

These are the test methods (or steps) we are going to use. Notice that all of them have a @Test annotation. That’s how TestNG finds out which methods should be invoked by the test runner. If you forget to add the annotation, TestNG will not execute the method.

2) Configuration methods

If you are familiar with unit testing frameworks, you probably know about the setup and teardown methods. TestNG goes beyond that idea and allows you to define methods that will be run after or before your test suites, test groups or test methods.

This is very useful for our Selenium tests because you can create a Selenium server and browser instance before you start running your test suite. People often complain about the browser window being opened before every test or not being able to run the Selenium server programmatically because don’t know about this :)

To achieve this, we will use two TestNG annotations: BeforeSuite and AfterSuite:

@BeforeSuite(alwaysRun = true)
public void setupBeforeSuite(ITestContext context) {
String seleniumHost = context.getCurrentXmlTest().getParameter("selenium.host");
String seleniumPort = context.getCurrentXmlTest().getParameter("selenium.port");
String seleniumBrowser = context.getCurrentXmlTest().getParameter("selenium.browser");
String seleniumUrl = context.getCurrentXmlTest().getParameter("selenium.url");

RemoteControlConfiguration rcc = new RemoteControlConfiguration();
rcc.setSingleWindow(true);
rcc.setPort(Integer.parseInt(seleniumPort));

try {
server = new SeleniumServer(false, rcc);
server.boot();

} catch (Exception e) {
throw new IllegalStateException("Can't start selenium server", e);
}

proc = new HttpCommandProcessor(seleniumHost, Integer.parseInt(seleniumPort), seleniumBrowser, seleniumUrl);
selenium = new DefaultSelenium(proc);
selenium.start();
}

@AfterSuite(alwaysRun = true)
public void setupAfterSuite() {
selenium.stop();
server.stop();
}

PS: Did you notice those weird parameters? They are stored in the XML file (we are going to see in the next section) and accessed by a ITestContext object, which was injected.

By adding these annotations, the TestNG engine will invoke the configuration methods “automagically” before/after your test suite (make sure the test methods are annotated with @Test), launching the Selenium server and instantiating the Selenium client object only once, reusing the same browser session across the tests. Isn’t it awesome? :)

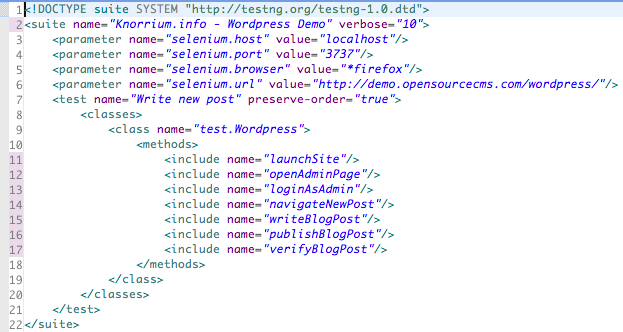
3) Creating the XML file

Now, to define the order of the tests, we will have to create a XML file listing the test methods we would like to run. Make sure that the test methods are annotated with @Test, or else the TestNG engine will not invoke them.

Before TestNG 5.13.1, you had to use Method Interceptors if you wanted to run the tests in the order defined in the XML file. I have posted my implementation of a Method Interceptor on my Github account. From TestNG 5.13.1+, you can just add the “preserve-order” parameter to your test tag and include the methods you would like to run, reducing unecessary code in your test suite.

And here is the XML file:
4) Installing the TestNG Eclipse plugin

We finished writing our tests, now how can we run them?

You can launch TestNG from the command line, using a Eclipse plugin or even programatically. We are going to use the Eclipse plugin.

Follow the steps described on the official TestNG documentation over here. There is no point in duplicating this information.

If you installed TestNG correctly, you will see this menu when you right click on the XML file:

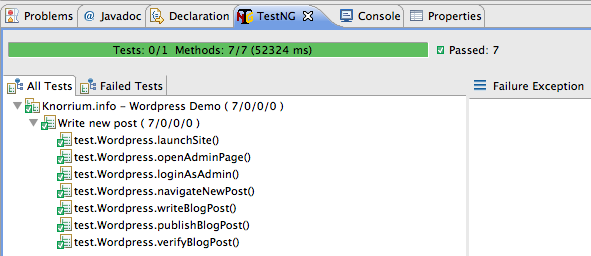
Click on “Run as TestNG Suite” and your test will start running. You will then see this nice results tree:
5) Thinking about the future

If you really want to think about the future of your test suite, I would recommend you to read Adam Goucher’s article published on PragPub this month. He talks about Selenium 2 and the Page Objects Model (a very nice way to model your tests, especially if you use Selenium 2).

Since there are lots of people still using Selenium 1, I’ll stick to that for a while, but Selenium 2 will eventually be covered here.

Anyway, as the number of tests in your test suite grows, you will find that grouping them in different test classes is a good idea. If you do that, you can take advantage of object oriented programming and create a new class named BaseTest (for example), and leave your configuration logic there. That way, every test class must extend the BaseTest class and use static attributes.

public class WordPressAdmin extends BaseTest {
@Test
public void test1(){
selenium.open("");
//...
}
@Test
public void test2(){
selenium.open("");
//...
}
}

It does look better than leaving your configuration methods in the test class, doesn’t it?

Conclusion

TestNG provides very powerful configuration methods and flexibility to let you do pretty much whatever you want with your tests. The goal of this post was to introduce you to TestNG and some basic concepts, just to spark your interest.

The next posts will cover more advanced features like method groups, listeners (for reports and taking screenshots) and data providers (for data driven testing). Stay tuned.

In the next few days the code used in this post will be up at my Github account. I’ll update this post and also tweet about it.

PS: I’m having some problems with the comments system, everything is being flagged as spam. If you want to discuss about TestNG, feel free to join the TestNG-users group, linked way up above.

Firebug and XPath: two new ingredients to the mix.

June 1st, 2010 No comments

Hello everyone!

In our previous post, we learned the basics to record a Selenium script using IDE and run it with JUnit.

Today we are going to learn how to use Firebug and basic XPath to locate elements on your test page.

Things you will need for this lesson:

  • Firefox
  • The Firebug extension
  • The FireXPath extension for Firebug or XPather

If you read the code generated by Selenium IDE, you might have noticed the following cryptic line:

selenium.click(“//div[@id=’wpbody-content’]/div[2]/h2/a”);

What is that? What does it mean?

To understand it better, I would like to introduce you to your new friend, the XPath expression!

XPath expressions are used when you want to navigate a XML structure using its elements and their attributes. Since the HTML DOM (Document Object Model) is technically a XML file as well, we can parse it with XPath.

When an HTML element is not easily identified or when you need to identify an element based on the relative position of another element, you can use XPath to locate it. Selenium IDE does not generate user friendly expressions and there is a high chance it won’t work across different browsers, so let’s use that line to learn a few things.

Let’s see that line again:

selenium.click(“//div[@id=’wpbody-content’]/div[2]/h2/a”);

If you know some basic HTML, you will see that it has something to do with HTML tags. Start reading from right to left. Can you identify any familiar tags?

We have three tags in that expression:

  • a – link
  • h2 – heading 2
  • div – div

So, Selenium will click on a link contained in a heading text, which is contained in the second div inside the div which ID is “wpbody-content”.

Phew! That’s quite a long example. How about a visual approach?

Visual XPath with XPather

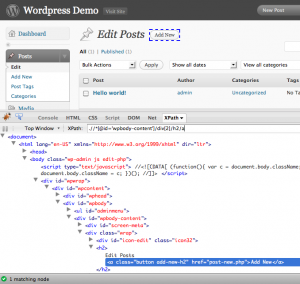
Open Firebug and click on the XPath tab, let’s find alternatives to that expression.

Start with something easy, type “//a” – you should see around 90 results. It doesn’t look so unique, does it? It is important to use unique expressions to identify the elements you want to interact with, unless you want to iterate over them, but that’s something for another post :)

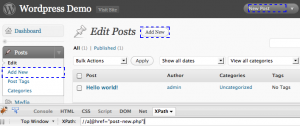
Now that you have all the links filtered, type “//a[@href=’post-new.php’]” – you should get only three results by now:

XPather highlighting 3 elements

Still not unique enough. If you observe the 3 results, you will notice that they are in different containers: the first is in a “div”, the second in a “li” and the third in a “h2” tag. Now, you can reduce the original expression down to “//TAG/a[@href=’post-new.php’]”. Try it!

Instead of using the HREF property, we could have searched for links containing the “Add New” text, using “//a[contains(text(), ‘Add New’)]”, but if you try to parse that expression, you will see that FireXPath returns about 8 results. How do we select the right link? A good option would be:

//a[contains(text(),’Posts’)]/following::a[contains(text(),’Add New’)][1]

Notice that we are using two new things here, a XPath Axis (“following”) and an index [1].  Axes are used to work with node sets relative to the current node, in this case, the “Posts” link. Since the “following” axis returns a set of nodes, we are only interested in the first, thus the need for the [1] index.

In the last post, our script only was able to fill only the “Title” field, not the actual post text. As an exercise, you can change the script write a complete post, with tags, categories and text.

Additional resources:

XPath guide at W3 Schools

Getting started with web automation: A Java approach to Selenium

May 19th, 2010 6 comments

Hello everyone!

The first post on this blog will be about automation of web applications using Selenium. If you don’t know what Selenium is, I suggest you to go to the Selenium website or listen to Matt Heusser‘s podcast on Selenium before proceeding.

My plan is to start with small steps, so we will begin using Selenium IDE to record scripts and export them to Java. From this post on, we will then start adding more libraries to the mix, deal with more complex scenarios and maybe even run the tests from a continuos integration server or in multiple environments at once.

Please be aware that this post will get pretty lengthy.

Here we go!

  1. Launch FireFox
  2. Download the Selenium IDE extension (currently at version 1.0.6)
  3. Restart Firefox
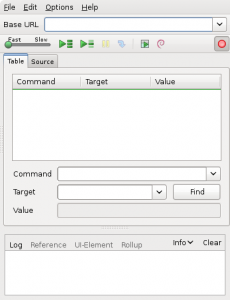
  4. Go to the Tools tools menu and select Selenium IDE:

The Selenium IDE window (empty)

You are now ready to start recording your first scripts! But what are we going to record?

Most Selenium tutorials I’ve seen on the Internet use Google as the first “Hello World” example. I would like to avoid doing more of the same and use a different website for our first example. How about Twitter or Facebook? Nah… they require personal data and are kinda complex for a first example.

Hmm… Since we are using open source software, how about we test open source software as well?

OpenSourceCMS.com is a great place to find live demos of real applications, let’s pick WordPress, since it’s the blogging engine that powers this blog.

Before we proceed, keep in mind that an automation project is, as it says, a project. So we need to do some planning before we start working on our script. You do plan before you test, right? :)

If we had to write a simple test case for the “Create New Post” functionality it would look like this:

  1. Go to http://demo.opensourcecms.com/wordpress/wp-login.php
  2. Enter “admin” in the “Username” field
  3. Enter “demo123” in the “Password” field
  4. Click on the “Log In” button
  5. Verify that the text “Howdy, admin” is present
  6. Click on the “Posts” link
  7. Click on the “Add New” button
  8. Type “Selenium Demo Post” in the title field
  9. Click on the “Publish” button
  10. Verify that the text “Post published” is present

Quick planning done, point your browser to http://demo.opensourcecms.com/wordpress/wp-login.php and open Selenium IDE again. Repeat the steps defined above. To verify that a text is present, select the text, right click on it and select the “verifyTextPresent …” option.

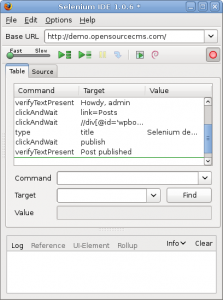
You should now see that Selenium IDE recorded all your actions, as pictured below:

Selenium IDE with recorded steps

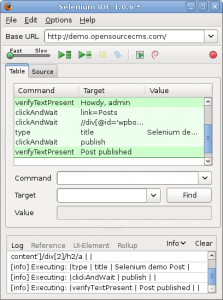
Now, logout, set Selenium IDE to stop recording and click on the “Play current test case” button. It should playback your actions and mark all steps as passed:

Selenium IDE playback

And that was your first Selenium script! Quite simple, wasn’t it? If you are happy with Selenium IDE, you can stop here, otherwise, keep reading!

“Wait! I want more! The title of this post says “a Java approach to Selenium” and I’m not seeing any Java yet!”, you might think.

Correct. We are going to export our test to Java and run it with JUnit under Eclipse.

With the Selenium IDE window still open, click on “File -> Export Test Case As -> Java (JUnit) – Selenium RC” and save it as “WordPress.java”.

Before we proceed, we have to setup our Eclipse environment:

  1. Download Eclipse IDE for Java Developers
  2. Run Eclipse and create a new Java project, name it Selenium (or whatever you want)
  3. Right click on the project and click “Build Path -> Configure Build path”
  4. Click on the “Library” tab and click on the “Add External Jars” button
  5. Select the following file: selenium-java-client-driver.jar
  6. Right click on the project again, select “Build Path -> Add Library” and add “JUnit 4”

For now, we are going to run the Selenium server via the Terminal (if you are running Windows, just launch “cmd” from the “Start -> Run” window). In future posts we will integrate the Selenium server with our tests :)

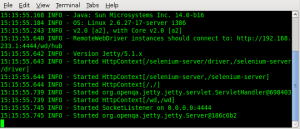
Run the Selenium server with the “java -jar selenium-server.jar” command:

Selenium server running

Let’s go back to Eclipse. Create a new Java class named “WordPress” and paste the contents from the “WordPress.java” file you exported with Selenium IDE.

Right click on the Java editor and select “Run As -> JUnit Test”.

Eclipse will now compile your code and start your tests with Selenium:

Running the test

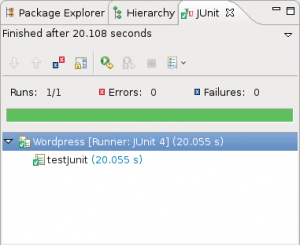
You should now see the JUnit report once the execution is over:

JUnit execution report

And that’s it. You have successfully ran your first Selenium script with JUnit!

The code for the script used on this post is here. I didn’t upload the entire project because I think the instructions were pretty straight-forward.

If you have any questions or suggestions regarding the subject of this post, or even if I made some English mistakes, please leave your feedback :)